Fruit Tree Grafting Shortcuts/Tips for Apple Scion + rootstock
(an engineer's approach)
Unusual tips shown below:
- Make a wooden jig that defines the graft angle
- Use needle-nose pliers to pull thru the rubber band/
In grafting, a scion is a piece of vegetative material (like a shoot or bud) taken from a desired plant variety, which is then joined to the rootstock (the lower part of the grafted plant) to create a new plant with the characteristics of both the scion and rootstock.

using slotted (channeled/grooved/dado) tapered wood jig, cut scion angle, with the knife following the jig angle as a guide. No body parts are near, thus increasing safety. Look closely at the angle of the plywood cutting surface. (knife held in r.h. and pulled toward onesself (self is on the right in this case!))
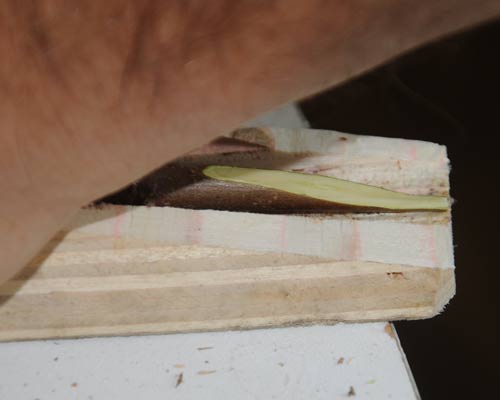
just after knife finished the cut. The end may need to be groomed to get the desired ellipitcal cross-section. I experimented with differing angles, and depths, and groove widths, and in the end it didn't seem to make that much difference as long as the stem fit into the groove. One can tilt slightly if needed to get a steeper slope. The trick was to grab hold firmly of the other end since the pulling force of the knife was quite strong.

using a different scrap of wood (a patented device!), with the knife blade parallel to the wood surface, and wiggling one or both of the knife and scion/rootstock, the blade safely/reliably makes the needed slit. The key here is that it's easy to (1) keep the blade parallel for a more reliable cut (parallel to the cambium fibers, so you don't nick them along their tubular conduit axis), and (2) to control carefully so the knife doesn't overshoot the extent of the slice (a little pressure against the wood helps the control)

part-way thru wigglings

blade parallel to wood and stem edge. Wood block provides support and safety in many aspects for better control of the cut.
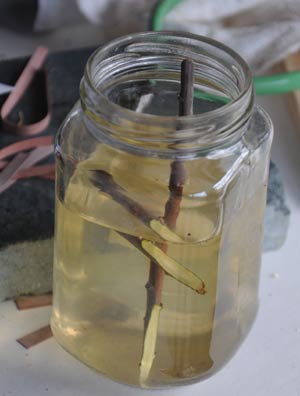
Store both scions and rootstock(upside down, roots in the air) with diagonal cut ends in water - this seemed to soften the wood to make it more pliable for fitting the ends together (bending for better surface contact when the rubber band is applied for slight inevitable imperfections in the planar diagonal surfaces), as well as the obvious keeping them wet until union (my guess was that with the roots still wet from a previous dunk in water, the graft business end was more critical at this point).
Scion whips left at room temperature for very long lessens their viability-- store in the refrig (not freezer!) away from any produce/fruit that emits Ethylene gas: apples, bananas, a huge list (google them) - Ethylene will kill the dormant buds.

(i'm righthanded, out of the frame, top left) Holding the rootstock midway (to be balanced), start rolling the stem (with left hand: shown on the right in the picture from the camera's perspective) between thumb and fingers to spin (like a lathe) the stem+scion to wind up the rubber band graft tape (fed stretched, under tension, with right hand) over the graft, much like winding a bobbin. After the first loop that will hold the starting end in place, you can let go of the accumulating band on the stem and move your spinning hand to midway down the rootstock where it will balance everything nicely (espec with roots flopping around)

Midway winding snapshot - it goes very quickly to spin it with your left hand (and the weight is all balanced)
(Camera perspective shows my left hand on the right in the picture)

once the graft is covered, wind first loop around your index finger (after a couple you'll find the right positioning to facilitate the next step)

... and then a second loop and hold the end with your thumb against the stem.
(Experiment to see what knot choreography is most comfortable for you)
Leave a space under that first loop for the pliers in the next step...

go underneath the first loop with closed pliers to grip the second loop (tail end) with needlenose pliers (i have small/miniature ones) opening just enough to grab the end.

... and pull it thru to make the closing knot to tie off the band/tape. Pliers make it so easy to catch the end and pull it thru, rather than trying to finagle/urge/pinch the end thru the loop with your fingers.

finished graft (before TreeKote or plastic grafting tape outer coat to help seal in moisture). Graft area is still wet from having been soaked. I dunked it in water again to be sure it's not drying out.
Grafting References: